Digital Elements in the blog header from Hidden Vintage Studios and Holliwood Studios @ DeviantScrap.com

Sunday, November 27, 2011

Chicken Wire Basket Tutorial


Hey it's time for a little tute! Since it's time to do some serious Christmas crafting let's get down to it.......

You need a piece of Chicken wire about 18 inches long and 2 feet high.  Put a dish towel down so you don't scratch your table or counter top.
 I use these big tin snips to cut the wire.....

You will need  a bowl that measures 6 inches across and is 4 inches or more deep.

Flip the bowl upside down and place the chicken wire over it.

Start to form the wire around the begin to mold it around the bowl working your way around the bowl.

 Grab the wire and the bowl and flip it over so that wire is still molded around the bowl.

Now you are going to use your wire cutters and trim about 2 inches from the edge of the top of the bowl the whole way around and discard the wire you cut off.

It should look like this.......

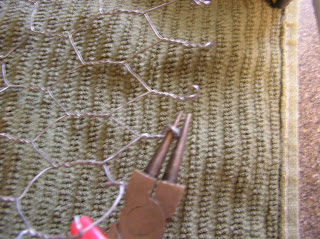
Now for the scratchy part.  Start to form the edge of the wire around the edge of the bowl. Press firmly.

Time for a trim job again!  Trim the wire flush to the top of the bowl. Remove the bowl.

Now take a small pair of pliers ( used round nose) and bend the wire over so it won't poke you.

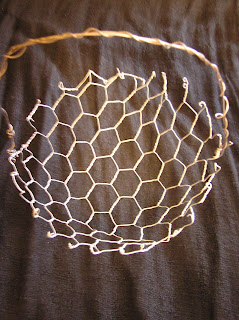
Your bowl should look like this......

I took three, 16 inch pieces of 18 gauge wire and roughly twisted them around to make a handle.


I put a piece of burlap in the bottom, filled it Spanish moss, glittered up a dollar store bird, added a hat and stuck him in a peat pot filled with tinsel.  I also attached a cotton batting and cream felt flower to the handle.  The whole assemblage was then glued to a glass candle holder base.

What would you put in your chicken wire basket?
Would you like more Christmas ornament inspiration?  Then click on over to see what fabulous ornaments Tracey has made at Glitterbug Studios.

Monday, November 21, 2011

Birds....birds.....birds.....

Fa-la-la-la-la-la-la-la-la-la! Four calling birds!  No I'm not working my way through the 12 Days of Christmas!  These ornaments were made with the Sizzix bird die.  


Chipboard layered between 2 pieces of decorative paper then cut with the die.  I used glitter paper on the wings.

This one is my favorite one.......
Three French Hens....two Turtle Doves......and a  you know what in a you know where!

Wednesday, November 9, 2011

Old "Time" Ornaments......

Just finished these ornaments the other day.  I got the Tim Holtz clockface die last Saturday and could hardly wait to try it out.  I layered old sheet music onto thick chipboard and cut out the clockface then backed it on cardstock over a piece of heavy chipboard.  Another smaller circle of chipboard serves as the base for the vintage angels which have been digitally created.  These are pretty good sized, about 5 inches in diameter.


I popped the inner circle with the angel on out by about 1/2 inch with a piece of foamcore board.  This gave me room to tuck the embellishments behind it and gave the overall ornament some depth.


Burlap seems to be my new material of choice this season.........and cream colored thick felt.

Old lace and tulle are always a winner for embellishing also!

It's all about a touch of glitter too, right?  This one has one of my prized vintage shell buttons on it.

Here's a close up of the little fellow.  Don't the buttons and lace look real? There is a lot of detail in the digital collages in the center of each ornament.
So what ornaments have you started to make?